Special Rate Schedules allow you to apply different pricing during specific dates or time periods without creating separate Rate Templates.
Instead of changing your standard rates, you can create one or more schedules under an existing rate to automatically apply special pricing when predefined conditions are met.
This feature is ideal for temporary pricing scenarios such as:
- Peak-hour pricing
- Night or early morning rates
- Public holidays
- Seasonal promotions
- Special events
- Limited-time pricing campaigns
Each schedule overrides the parent rate only during its configured time period. Outside the schedule, the standard rate is applied automatically.
Before You Start
Before creating a Special Rate Schedule:
- Create the parent rate (Regular, Fixed, or Hourly).
- Decide when the special pricing should apply.
- Prepare the pricing values for the scheduled period.
Access Time & Date Schedules
Navigate to:
Settings → Regular Rates (or Fixed Rates / Hourly Rates)
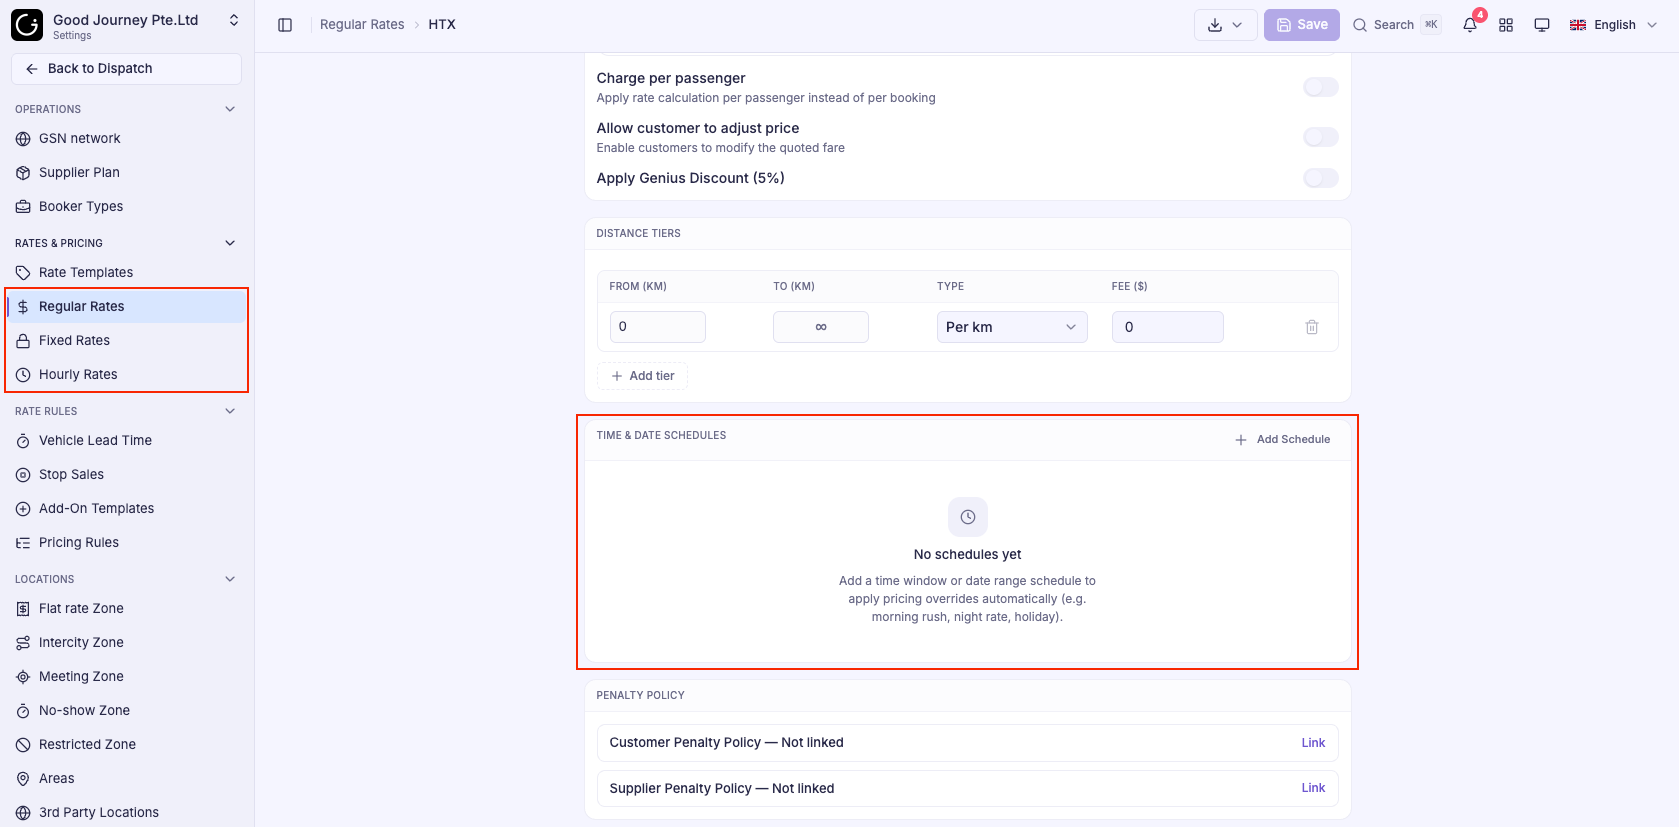
Open the rate you want to modify, then scroll to the Time & Date Schedules section.
Create a Special Rate Schedule
Step 1: Add a Schedule
Click Add Schedule.
A new schedule configuration form appears.
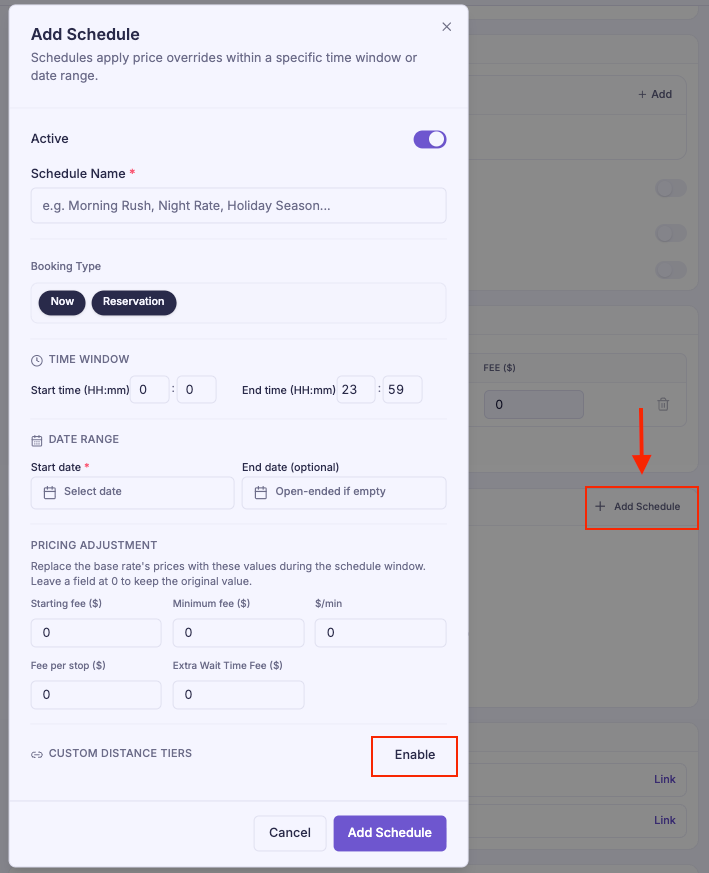
Step 2: Configure When the Schedule Applies
Specify when the special pricing should be used.
Configure:
- Booking Type
- On-Demand
- Reservation
- Pickup Time Window
- Start Date (Required)
- End Date (Optional)
If no End Date is specified, the schedule remains active until it is removed or updated.
Step 3: Configure the Pricing
Enter the pricing that should apply during the scheduled period.
Available pricing fields include:
- Starting Fee
- Minimum Fee
- Fare per Minute
- Additional Stop Fee
- Extra Wait Time Fee
These values override the parent rate whenever the schedule is active.
Step 4: Configure Distance Tiers (Optional)
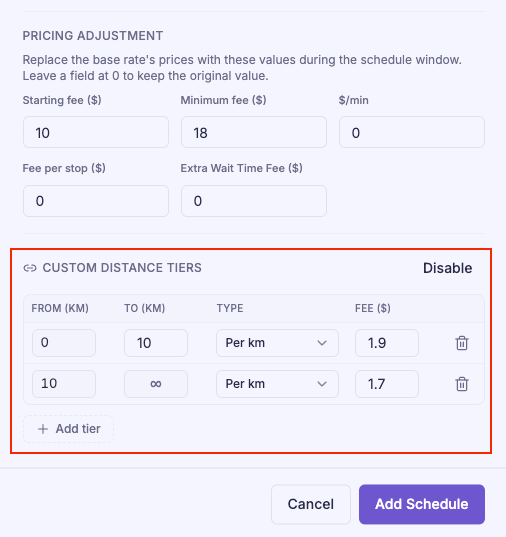
If the scheduled pricing uses custom distance pricing:
- Enable Custom Distance Tiers.
- Add the required distance tiers.
- Configure pricing for each tier.
This allows scheduled pricing to use a different distance structure from the parent rate.
Step 5: Save the Schedule
After completing the configuration:
- Save the schedule.
- Save the parent rate.
Your special pricing will automatically become effective during the configured period.
How Rate Schedules Work
When calculating a fare, the system checks whether a booking matches an active schedule.
If the booking meets the configured conditions:
- Booking Type
- Pickup Time
- Date Range
the scheduled pricing is used.
If no matching schedule is found, the system applies the parent rate.
Common Use Cases
Special Rate Schedules are commonly used for:
- Night rates
- Morning peak pricing
- Weekend pricing
- Holiday surcharges
- Festival or event pricing
- Seasonal rate adjustments
- Temporary promotional pricing
This allows you to manage short-term pricing changes without affecting your standard rates.
Best Practices
To keep pricing easy to manage:
- Use Rate Schedules for temporary pricing changes instead of creating new Rate Templates.
- Clearly define date ranges to avoid overlapping schedules.
- Review scheduled pricing before major events or holidays.
- Use descriptive schedule names where available.
- Always save both the schedule and the parent rate after making changes.
Was this article helpful?
That’s Great!
Thank you for your feedback
Sorry! We couldn't be helpful
Thank you for your feedback
Feedback sent
We appreciate your effort and will try to fix the article