This Create Bookings guide walks you through how to efficiently create, dispatch, and manage bookings from your Command Center Dashboard.
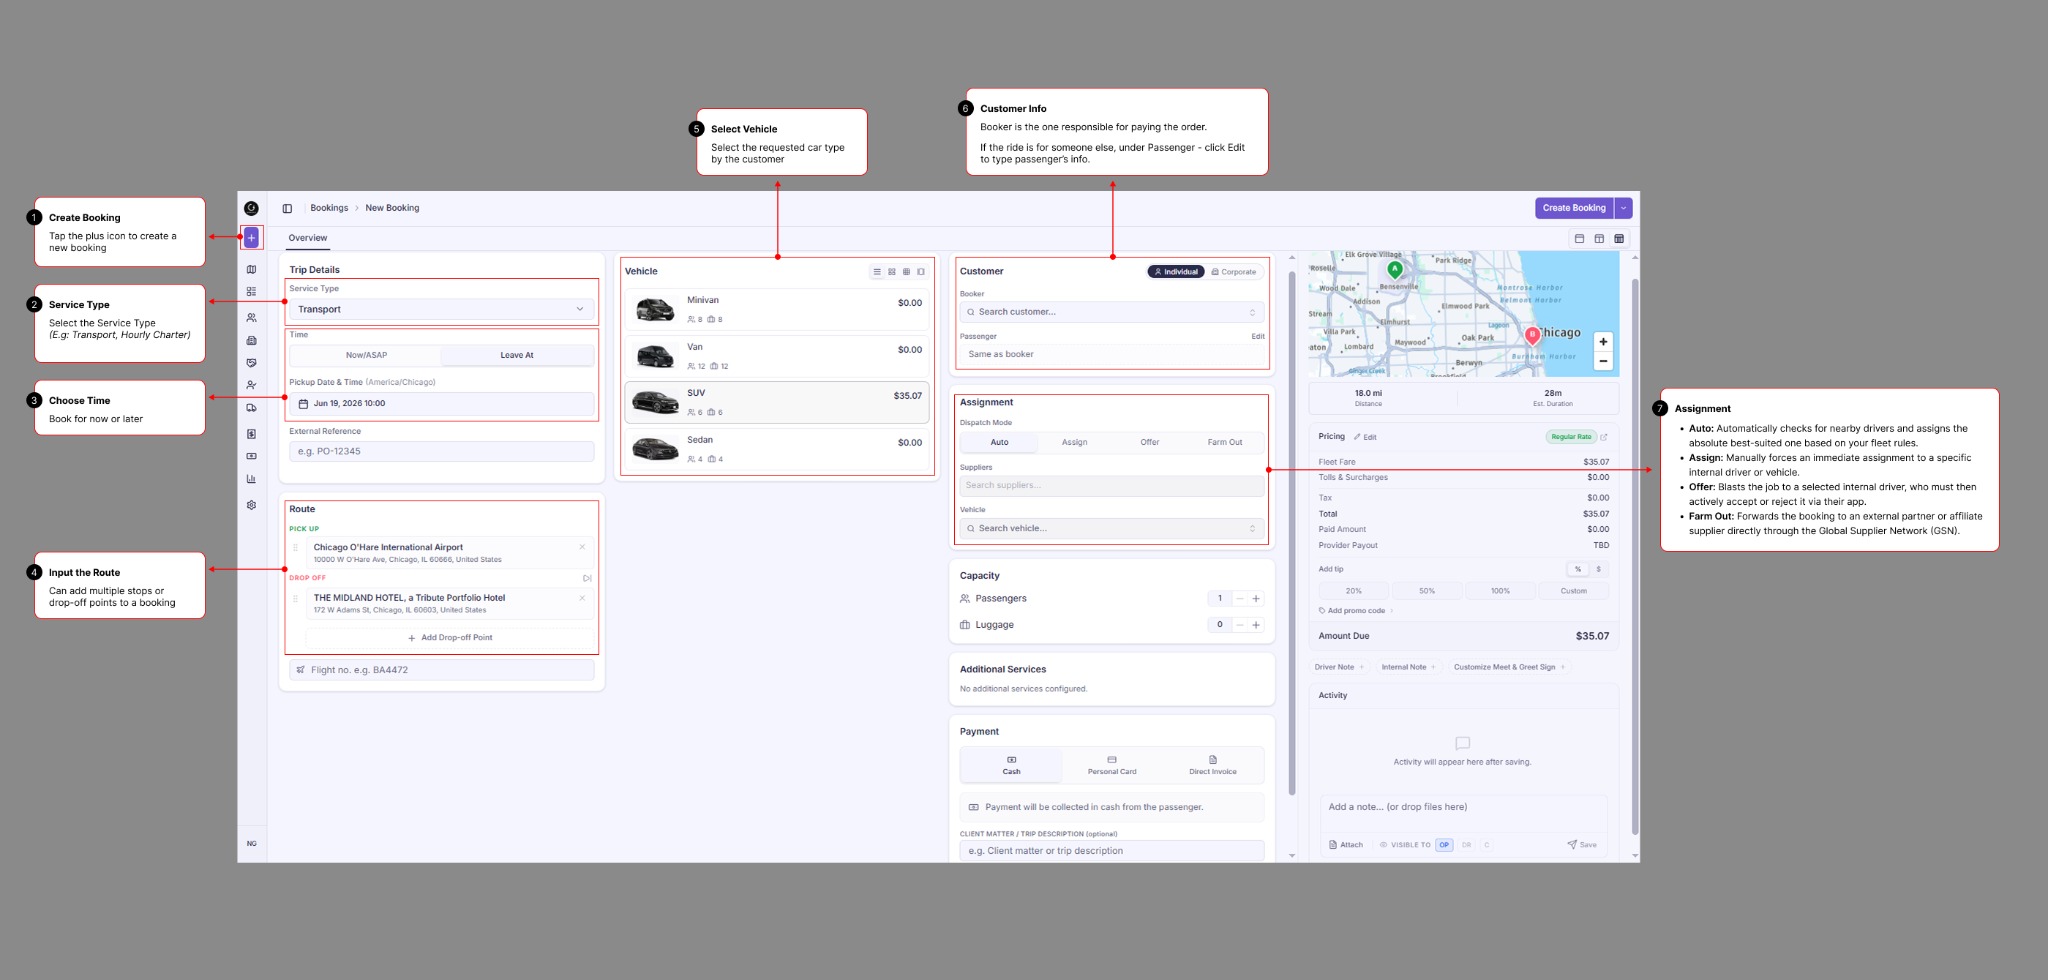
Step 1: Set Trip Details & Service Type
- Select the Service Type from the dropdown menu (e.g., Transport, Hourly Charter, From Airport).
- Choose the Time:
- Now / ASAP — for immediate dispatch.
- Leave At — to schedule a future booking.
- (Optional) Enter an External Reference if the booking is linked to a partner system or external platform.
Step 2: Enter the Route
- Enter the Pickup Address.
- Enter the Drop-off Address.
- Use:
- + Add Stop — for intermediate stops.
- + Add Drop-off Point — for multiple destinations.
Step 3: Select Vehicle & View Pricing
- Choose the requested vehicle type (e.g. Standard, Business, Van, Luxury).
- ? Pro-tip: Select your preferred vehicle layout: List, Compact, Grid, Horizontal.
Step 4: Add Customer & Passenger Information
Individual Booker
- A regular customer making a one-time booking.
Corporate Booker
- A traveler linked to a corporate account.
- May have corporate policies, special rates, and billing rules.
- For corporate customers there may be additional fields you can enter
By default, the passenger is set as Same as Booker.
If the ride is for someone else, click Edit and enter the passenger's name and phone number.
Step 5: Choose Assignment
- Auto: Automatically check and assigns the best available driver based on your fleet rules.
- Assign: Manually assign the trip to a specific driver or vehicle.
- Offer: Send the trip to selected drivers and allow them to accept or reject it.
- Farm Out: Forwards the booking to an external partner or affiliate via the Global Supplier Network (GSN).
Step 6: Set Capacity Limits and Additional Services
- Use the + / - buttons to adjust the total Passengers and Luggage count.
- Choose any requested account add-ons (e.g., child seats, pet transport). Stays blank if none apply.
Step 7: Choose Payment Method
Payment Method: Select how the ride will be settled:
- Cash
- Personal Card
- Corp Card
- Direct Invoice
- Corp Prepaid
References & Internal Notes (Optional):
- Client Matter / Trip Description: Add context notes about the ride purpose.
- Charge Code / Trip Code: Enter internal billing or department codes (e.g., DEPT-SALES).
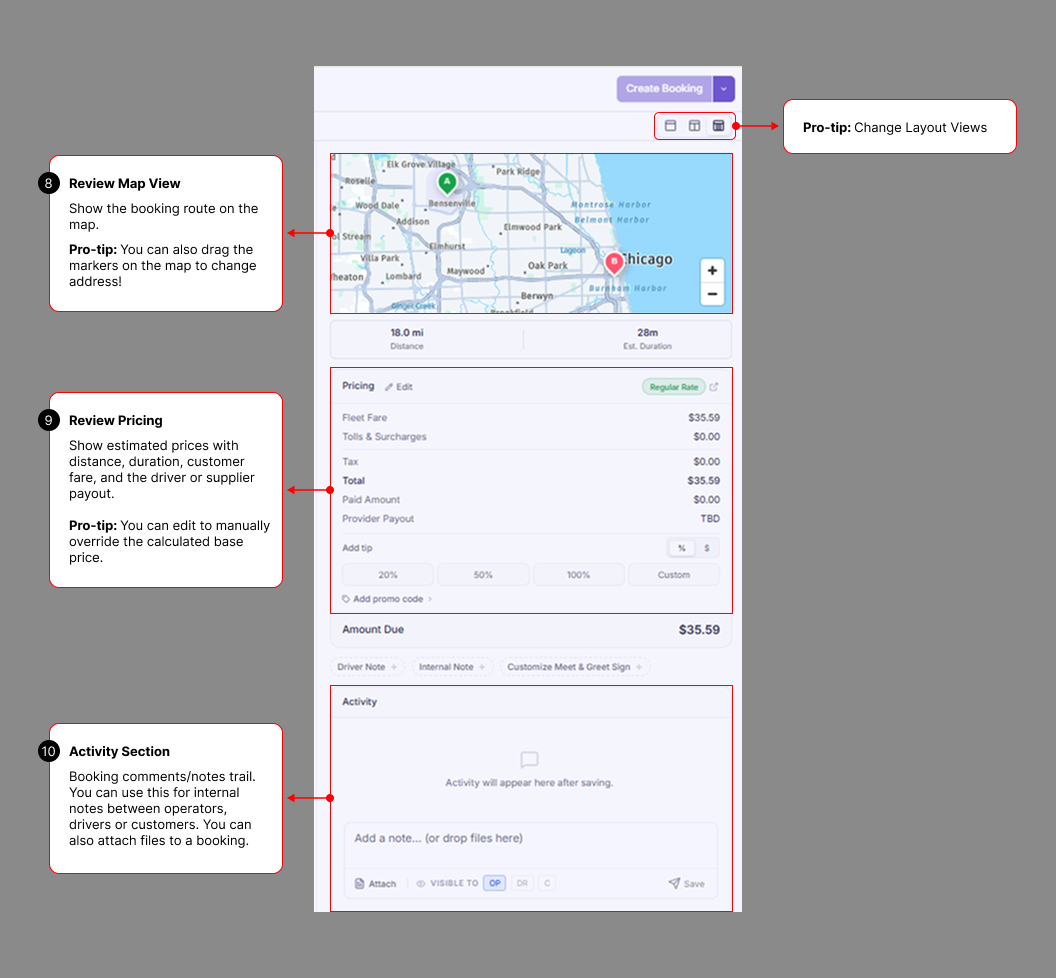
Step 8: Review Map View
- View the pickup and drop-off points on the map.
- Helps visualize the route before confirming the booking.
? Pro-tip: You can also drag the markers on the map to change the address!
Step 9: Review Pricing
The trip estimate card provides: distance, duration, customer fare, and the driver or supplier payout.
- Edit Rates: Click [Edit] to manually override the calculated base price.
- Tap Regular Rate to open your rate settings if you need to adjust future pricing.
- Add Tips: Use the quick percentage buttons (20%, 50%, 100%) or switch to $ to input a custom tip for the driver.
- Promo Codes: Click [Add promo code] to apply marketing discounts to the ride.
- Notes: Use [Driver Note] to send operational info directly to the driver's app, and [Internal Note] to leave a memo strictly for other dispatchers.
Step 10: Activity Section
This section contains the activity log for the booking. You can:
- Add notes with visibility control → Operator only, Driver, or Customer.
- Upload files such as:
- Itinerary
- Tickets
- Important customer documents
- Track incidents and operator actions for customer service history.
- Review all updates made to the booking in chronological order.
Step 11: Create Booking
- Once everything is reviewed, click Create Booking.
- The booking will be added to your Booking Queue (Queue Module) for dispatch and tracking.
? Quick Tip: Change Layout Views
You can switch between layout styles anytime using the layout selector buttons located at the top-right corner of the screen, next to the Create Booking button.
Was this article helpful?
That’s Great!
Thank you for your feedback
Sorry! We couldn't be helpful
Thank you for your feedback
Feedback sent
We appreciate your effort and will try to fix the article